


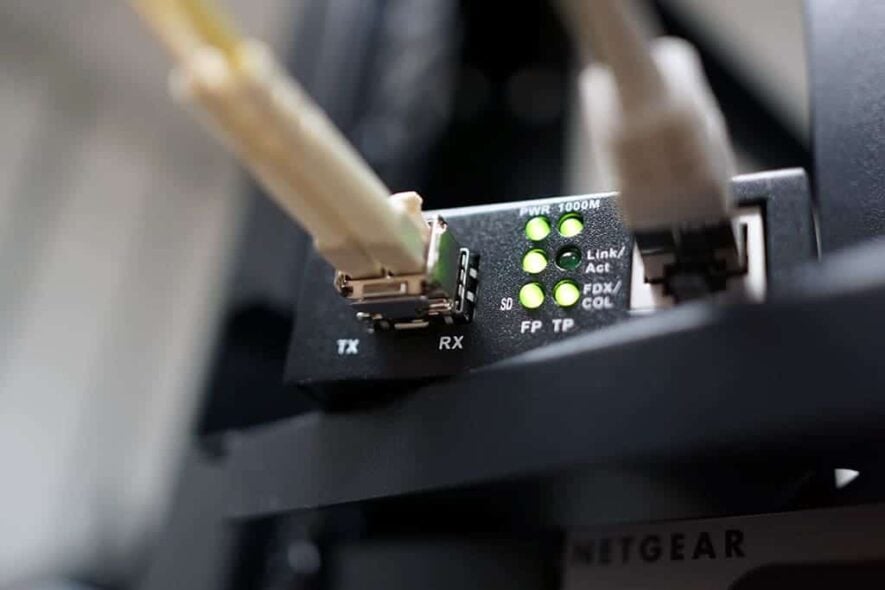

<span style="color: #1b1e23; font-family: -apple-system, BlinkMacSystemFont, 'Segoe UI', Roboto, Helvetica, Arial, sans-serif, 'Apple Color Emoji', 'Segoe UI Emoji', 'Segoe UI Symbol'; font-size: 15px;"> My first modification was installing a second PSU into my Hypex Nilai DIY500 Stereo amp to double the power output into 4 ohms.</span><br style="box-sizing: border-box; margin-top: 0px; color: #1b1e23; font-family: -apple-system, BlinkMacSystemFont, 'Segoe UI', Roboto, Helvetica, Arial, sans-serif, 'Apple Color Emoji', 'Segoe UI Emoji', 'Segoe UI Symbol'; font-size: 15px;" /><span style="color: #1b1e23; font-family: -apple-system, BlinkMacSystemFont, 'Segoe UI', Roboto, Helvetica, Arial, sans-serif, 'Apple Color Emoji', 'Segoe UI Emoji', 'Segoe UI Symbol'; font-size: 15px;">I disassembled the amp, drilled 14 new PSU mounting holes and five large holes to fit some metal Temu air vents. The additional PSU is supplied with two amplifier connection cables (not required), a power input cable and a 12 pin auxiliaries cable (J5).</span><br style="box-sizing: border-box; color: #1b1e23; font-family: -apple-system, BlinkMacSystemFont, 'Segoe UI', Roboto, Helvetica, Arial, sans-serif, 'Apple Color Emoji', 'Segoe UI Emoji', 'Segoe UI Symbol'; font-size: 15px;" /><span style="color: #1b1e23; font-family: -apple-system, BlinkMacSystemFont, 'Segoe UI', Roboto, Helvetica, Arial, sans-serif, 'Apple Color Emoji', 'Segoe UI Emoji', 'Segoe UI Symbol'; font-size: 15px;">I soldered the power input cable to daisy chain it with the original power input cable.</span><br style="box-sizing: border-box; color: #1b1e23; font-family: -apple-system, BlinkMacSystemFont, 'Segoe UI', Roboto, Helvetica, Arial, sans-serif, 'Apple Color Emoji', 'Segoe UI Emoji', 'Segoe UI Symbol'; font-size: 15px;" /><span style="color: #1b1e23; font-family: -apple-system, BlinkMacSystemFont, 'Segoe UI', Roboto, Helvetica, Arial, sans-serif, 'Apple Color Emoji', 'Segoe UI Emoji', 'Segoe UI Symbol'; font-size: 15px;">I also soldered five wires on the 12 pin auxiliaries cable to the original 12 pin cable. This required carefully removing some of the insulation from the original cable, soldering the ends of the new cable onto the original and then insulating with electrical tape. The five wires I connected were:</span><br style="box-sizing: border-box; color: #1b1e23; font-family: -apple-system, BlinkMacSystemFont, 'Segoe UI', Roboto, Helvetica, Arial, sans-serif, 'Apple Color Emoji', 'Segoe UI Emoji', 'Segoe UI Symbol'; font-size: 15px;" /><span style="color: #1b1e23; font-family: -apple-system, BlinkMacSystemFont, 'Segoe UI', Roboto, Helvetica, Arial, sans-serif, 'Apple Color Emoji', 'Segoe UI Emoji', 'Segoe UI Symbol'; font-size: 15px;">Pin 2: Ground</span><br style="box-sizing: border-box; color: #1b1e23; font-family: -apple-system, BlinkMacSystemFont, 'Segoe UI', Roboto, Helvetica, Arial, sans-serif, 'Apple Color Emoji', 'Segoe UI Emoji', 'Segoe UI Symbol'; font-size: 15px;" /><span style="color: #1b1e23; font-family: -apple-system, BlinkMacSystemFont, 'Segoe UI', Roboto, Helvetica, Arial, sans-serif, 'Apple Color Emoji', 'Segoe UI Emoji', 'Segoe UI Symbol'; font-size: 15px;">Pin 7: Pushbutton+</span><br style="box-sizing: border-box; color: #1b1e23; font-family: -apple-system, BlinkMacSystemFont, 'Segoe UI', Roboto, Helvetica, Arial, sans-serif, 'Apple Color Emoji', 'Segoe UI Emoji', 'Segoe UI Symbol'; font-size: 15px;" /><span style="color: #1b1e23; font-family: -apple-system, BlinkMacSystemFont, 'Segoe UI', Roboto, Helvetica, Arial, sans-serif, 'Apple Color Emoji', 'Segoe UI Emoji', 'Segoe UI Symbol'; font-size: 15px;">Pin 8: Pushbutton-</span><br style="box-sizing: border-box; color: #1b1e23; font-family: -apple-system, BlinkMacSystemFont, 'Segoe UI', Roboto, Helvetica, Arial, sans-serif, 'Apple Color Emoji', 'Segoe UI Emoji', 'Segoe UI Symbol'; font-size: 15px;" /><span style="color: #1b1e23; font-family: -apple-system, BlinkMacSystemFont, 'Segoe UI', Roboto, Helvetica, Arial, sans-serif, 'Apple Color Emoji', 'Segoe UI Emoji', 'Segoe UI Symbol'; font-size: 15px;">Pin 9: Trigger+/-</span><br style="box-sizing: border-box; color: #1b1e23; font-family: -apple-system, BlinkMacSystemFont, 'Segoe UI', Roboto, Helvetica, Arial, sans-serif, 'Apple Color Emoji', 'Segoe UI Emoji', 'Segoe UI Symbol'; font-size: 15px;" /><span style="color: #1b1e23; font-family: -apple-system, BlinkMacSystemFont, 'Segoe UI', Roboto, Helvetica, Arial, sans-serif, 'Apple Color Emoji', 'Segoe UI Emoji', 'Segoe UI Symbol'; font-size: 15px;">Pin 10: Trigger +/-</span><br style="box-sizing: border-box; color: #1b1e23; font-family: -apple-system, BlinkMacSystemFont, 'Segoe UI', Roboto, Helvetica, Arial, sans-serif, 'Apple Color Emoji', 'Segoe UI Emoji', 'Segoe UI Symbol'; font-size: 15px;" /><span style="color: #1b1e23; font-family: -apple-system, BlinkMacSystemFont, 'Segoe UI', Roboto, Helvetica, Arial, sans-serif, 'Apple Color Emoji', 'Segoe UI Emoji', 'Segoe UI Symbol'; font-size: 15px;">The end result sounds slightly better than with a single PSU IMO. The extra headroom seems to have given the bass more weight behind it and added to the overall clarity at louder volume.
My second modification was </span><span style="color: #1b1e23; font-family: -apple-system, BlinkMacSystemFont, 'Segoe UI', Roboto, Helvetica, Arial, sans-serif, 'Apple Color Emoji', 'Segoe UI Emoji', 'Segoe UI Symbol'; font-size: 15px;">adding a gain switch (on-off-on 6 pin) to the rear panel. Seems to work and can be easily reversed if it has any negative effect on the sound.
</span>
Cleaned the HTML so it is readable:
My first modification was installing a second PSU into my Hypex Nilai DIY500 Stereo amp to double the power output into 4 ohms. I disassembled the amp, drilled 14 new PSU mounting holes and five large holes to fit some metal Temu air vents. The additional PSU is supplied with two amplifier connection cables (not required), a power input cable and a 12-pin auxiliaries cable (J5).
I soldered the power input cable to daisy chain it with the original power input cable.
I also soldered five wires on the 12-pin auxiliaries cable to the original 12-pin cable. This required carefully removing some of the insulation from the original cable, soldering the ends of the new cable onto the original, and then insulating with electrical tape. The five wires I connected were:
- Pin 2: Ground
- Pin 7: Pushbutton+
- Pin 8: Pushbutton-
- Pin 9: Trigger+/-
- Pin 10: Trigger+/-
The end result sounds slightly better than with a single PSU, in my opinion. The extra headroom seems to have given the bass more weight behind it and added to the overall clarity at louder volume. Nilai with two PSUs. Case underside.
My second modification was adding a gain switch (on-off-on 6-pin) to the rear panel. It seems to work and can be easily reversed if it has any negative effect on the sound.
I have the mono blocks, so no need. But have you considered upgrading the fuses at the power inlets? Should be an easy upgrade with potentially a lot of improvement.
<p>Thanks Marc for adding the corrected text. Not sure what has happened there as it looked fine when originally posted. I am not looking at changing the power inlet fuse as I seriously doubt it would have any influence on the sound as it isn't in the audio path and my amp is completely silent with no music playing. I also got a chunky shielded power supply cable any heard no difference from the stock cable.</p>
<p>Ik maak geen reclame maar er is een Franse audiodealer (online webshop) die een stereoversie heeft gemaakt met duo power supply en 2 versterkermodules in 1 behuizing.</p><p>Verder heeft deze versie zowel XLR als RCA uitgangen en beschikt dit apparaat ook over een trigger in en trigger out voor eventueel aangekoppelde apparaten aan te schakelen.</p><p>De kast vind ik ook wat mooier en de terminals zijn heel goed.</p>